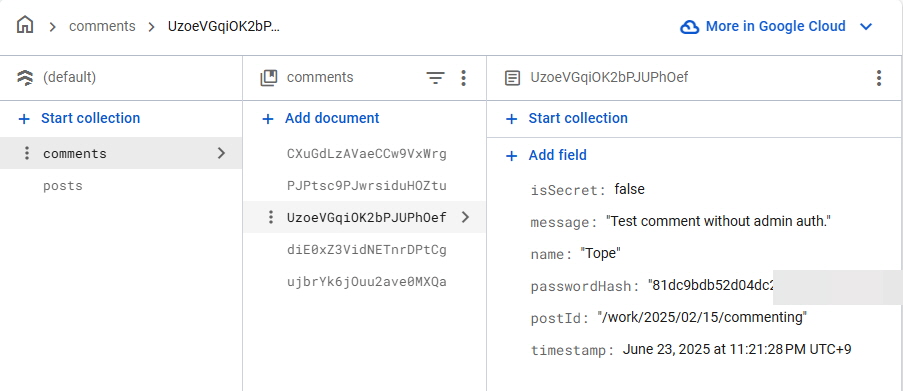
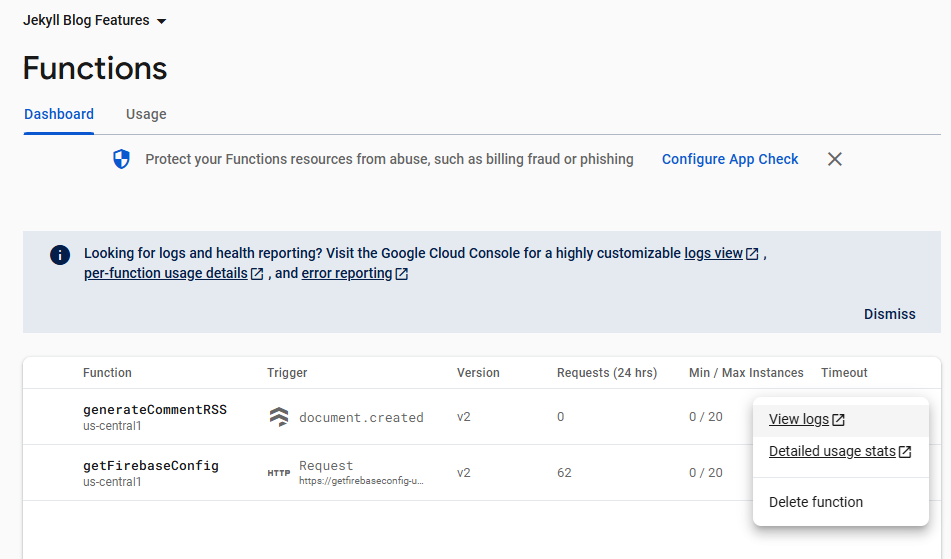
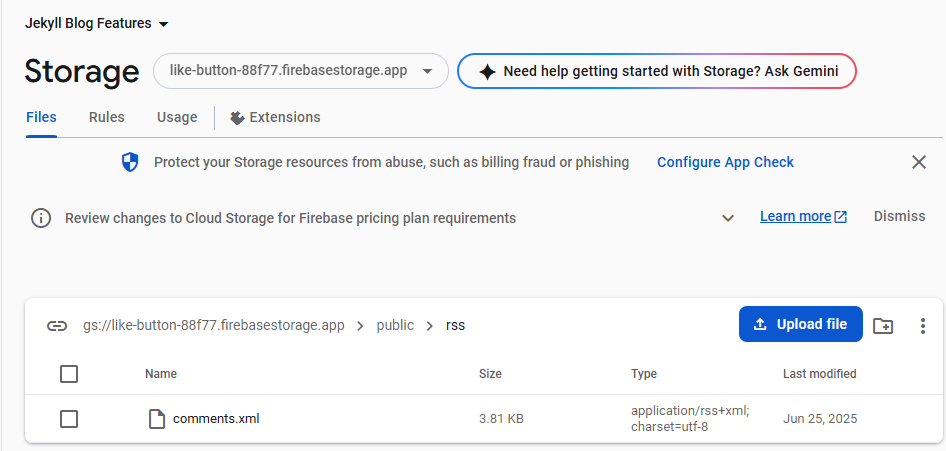
저는 Firebase를 이용하여 static website인 개인 홈페이지에 좋아요 버튼과 댓글창을 구현한 바 있습니다. 새로운 댓글이 달리면 Firebase Firestore Database에 새로운 document가 추가되어 닉네임, 댓글 내용, 비밀댓글 여부, 등이 기록됩니다. 하지만 달리 알림을 받지 못하여 누가 댓글을 쓰더라도 홈페이지에 자주 드나들지 않는 이상 놓치기 십상입니다. 이 포스트에서는 RSS와 Firebase Cloud Function을 이용하여 Firestore 댓글 목록을 RSS 피드로 만드는 과정을 정리해보았습니다.
아래에서 gaba-tope.github.io/ 디렉터리는 제 홈페이지 root directory입니다. 각자의 디렉터리명에 맞게 수정하여 사용하면 됩니다.
Firebase CLI와 모듈 설치
댓글 기능이 Firebase를 이용하니 당연히 Firebase 계정과 프로젝트가 생성되어 있는 상태입니다.
이때 로컬 컴퓨터에 Firebase Command-Line Interface (CLI)가 설치되어 있어야 합니다.
- node.js로 firebase를 설치 (
npm install -g firebase-tools) 후 로그인을 (firebase login) 합니다. -
gaba-tope.github.io/functions/디렉터리에서 terminal 열고 다음을 실행합니다.cd functions npm install firebase-admin npm install firebase-functions npm install feed # RSS 피드 생성을 위해 필요한 라이브러리. npm install @google-cloud/storage rss cors상위 폴더인
gaba-tope.github.io폴더에 node_modules 폴더가 생성되어 각 모듈이 설치됩니다.
사용한 모듈의 버젼은 다음과 같습니다:
{
  "name": "functions",
  "description": "Cloud Functions for Firebase",
  "scripts": {
    "serve": "firebase emulators:start --only functions",
    "shell": "firebase functions:shell",
    "start": "npm run shell",
    "deploy": "firebase deploy --only functions",
    "logs": "firebase functions:log"
  },
  "engines": {
    "node": "22"
  },
  "main": "index.js",
  "dependencies": {
    "@google-cloud/storage": "^7.16.0",
    "cors": "^2.8.5",
    "feed": "^5.1.0",
    "firebase-admin": "^11.5.0",
    "firebase-functions": "^6.3.2",
    "rss": "^1.2.2"
  },
  "devDependencies": {
    "firebase-functions-test": "^3.1.0"
  },
  "private": true
}
Idea
프로젝트의 기본 아이디어는 다음과 같습니다:
- Firebase Cloud function을 이용하여 comment가 추가될 때마다 xml을 생성한다.
- RSS 파일을 Firebase storage에 넣고, 해당 Storage 파일에 public URL을 발급하면 Storage URL을 통해 RSS feed 링크에 접근할 수 있다.
Firebase hosting 생성
gaba-tope.github.io/ root folder에서 terminal을 열고 firebase init hosting을 실행합니다.
- 기존 프로젝트 선택
- 자동생성될
public폴더. - single-page app?:
n - Automatic builds?:
n - Overwrite existing public/index.html?
y
이후 firebase deploy --only hosting로 deploy합니다.
배포가 성공하였다면 Hosting URL: https://like-button-88f77.web.app과 같이 Hosting URL이 뜰 것입니다.
public 폴더는 root folder의 .gitignore에 public/를 추가하여 git에서 무시해주었습니다.
Firebase Storage 생성
- Firebase Console 접속
- 왼쪽 사이드바 → “Storage” 클릭
- “시작하기” 버튼 누르기
- 위치(Region)는 보통 Cloud Function과 같은 region으로. (예: us-central1)
- 일단 test모드로 한 후 이후에 production rule로 수정.
- “완료” → Storage Bucket 자동 생성됨.
Cloud Function 만들기
이전에 cloud function 만든 것이 있다면 index.js에 함수만 추가해주면 됩니다. 아래는 지금 보기에는 불필요한 exports.getFirebaseConfig()함수도 포함되어 있습니다. 코드의 90%는 Claude가 짜줬다..ㅎㅎ
Click to see the JavaScript code.
// Make sure you DEPLOY function after changing this script.
// firebase-function module v3 used
//const functions = require('firebase-functions');
const { onRequest } = require('firebase-functions/v2/https');
const admin = require('firebase-admin');
const fs = require('fs');
const path = require('path');
const cors = require('cors')({
  origin: [
    'http://localhost:4000',
    'https://gaba-tope.github.io'
  ],
});
//const cors = require('cors')({ origin: 'http://localhost:4000' }); // Replace with your Jekyll site's origin
const RSS = require('rss');
const { Storage } = require('@google-cloud/storage');

// Firebase Admin 초기화
if (!admin.apps.length) {
  admin.initializeApp();
}

// Cloud Function: Fetch Firebase Config
exports.getFirebaseConfig = onRequest({
  memory: '256MiB',
  cpu: 1,
  timeoutSeconds: 60,
}, (req, res) => {
  const configFilePath = path.join(__dirname, 'firebase-config.json');

  try {
    cors(req, res, () => {
        const configData = fs.readFileSync(configFilePath, 'utf8');
        res.json(JSON.parse(configData));
      });
    //const configData = fs.readFileSync(configFilePath, 'utf8');
    //res.json(JSON.parse(configData));
  } catch (error) {
    console.error('Error reading config file:', error);
    res.status(500).send('Error reading configuration');
  }
});

// Cloud Function: Generate Comment RSS
const bucketName = 'like-button-88f77.appspot.com';
const db = admin.firestore();
const storage = new Storage();

// 댓글이 추가될 때마다 RSS 피드 생성
const { onDocumentCreated } = require('firebase-functions/v2/firestore');

exports.generateCommentRSS =  onDocumentCreated({
  document: 'comments/{commentId}',
  memory: '256MiB',
  cpu: 1,
  timeoutSeconds: 60,
}, async (event) => {
  //const bucketName = 'like-button-88f77.appspot.com';
  try {
    const newComment = {
      id: event.params.commentId,
      ...event.data.data()
    };

    // Firebase Storage 기본 버킷 사용 (자동으로 올바른 버킷명 가져옴)
    const bucket = admin.storage().bucket();
    const bucketName = bucket.name;
    console.log('Using bucket:', bucketName);

    // 전체 최신 댓글 20개 가져오기 (모든 포스트 통합)
    const recentCommentsSnapshot = await db.collection('comments')
      .orderBy('timestamp', 'desc')
      .limit(20)
      .get();

    // RSS 피드 생성
    const feed = new RSS({
      title: '블로그 댓글 알림',
      description: '새로운 댓글이 달렸을 때 알림을 받아보세요',
      feed_url: `https://storage.googleapis.com/${bucketName}/public/rss/comments.xml`,
      site_url: 'https://gaba-tope.github.io/',
      language: 'ko-kr',
      copyright: "2024 Tope's Cytoplasm",
      ttl: 120
    });

    // 댓글들을 RSS 아이템으로 추가
    const comments = [];
    recentCommentsSnapshot.forEach(doc => {
      comments.push({ id: doc.id, ...doc.data() });
    });

    comments.forEach(comment => {
      // 비밀댓글 처리
      const isSecret = comment.isSecret || false;
      const title = isSecret
        ? `🔒 [비밀댓글] ${comment.name}님이 댓글을 남겼습니다`
        : `💬 ${comment.name}님의 댓글`;

      const description = isSecret
        ? '비밀댓글이 작성되었습니다. 내용은 작성자와 관리자만 볼 수 있습니다.'
        : comment.message;

      const postUrl = comment.postId
        ? `https://gaba-tope.github.io${comment.postId}#comment-${comment.id}`
        : 'https://gaba-tope.github.io/';

      feed.item({
        title: title,
        description: description,
        url: postUrl,
        guid: `comment-${comment.id}`,
        date: comment.timestamp ? comment.timestamp.toDate() : new Date(),
        categories: ['댓글', isSecret ? '비밀댓글' : '일반댓글'],
        author: comment.name
      });
    });

    // Generate XML
    const xml = feed.xml({ indent: true });

    // 버킷이 존재하는지 확인
    const [bucketExists] = await bucket.exists();
    if (!bucketExists) {
      console.error('Storage bucket does not exist. Please create Firebase Storage first.');
      throw new Error('Storage bucket not found');
    }

    // Save RSS XML to Cloud Storage
     const file = bucket.file('public/rss/comments.xml');

    await file.save(xml, {
      metadata: {
        contentType: 'application/rss+xml; charset=utf-8',
        cacheControl: 'public, max-age=300' // 5분 캐시
      }
    });

    // Make the file public
    await file.makePublic();

    const publicUrl = `https://storage.googleapis.com/${bucketName}/public/rss/comments.xml`;
    console.log(`RSS feed updated:`, publicUrl);

    return null;
  } catch (error){
    console.error('RSS 생성 실패:', error);
    // Error Specifics
    if (error.code === 404) {
      console.error('Bucket not found. Please check if Firebase Storage is properly initialized.');
    }

    throw new Error('RSS feed generation failed: ' + error.message);
  }
});
이후 Firebase CLI에서 firebase deploy --only functions로 함수를 deploy하면 끝입니다.
뭔가 잘 안된다 싶으면 log를 보는 것이 큰 도움이 됩니다.
RSS로 받아보기
위 과정을 통해 생성된 RSS 주소는 https://storage.googleapis.com/like-button-88f77.firebasestorage.app/public/rss/comments.xml입니다. Firebase project명에 따라 달라지겠지만 기본 포맷은 https://storage.googleapis.com/<프로젝트이름>.firebasestorage.app/public/rss/comments.xml이 되겠습니다.
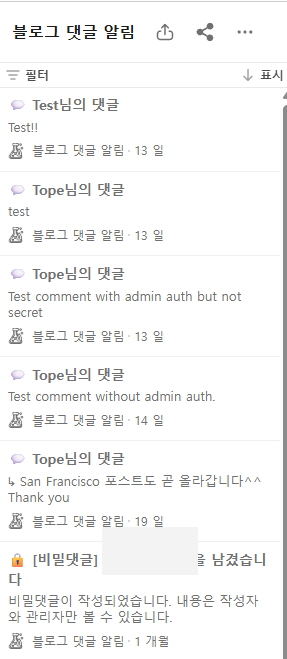
이후 RSS URL을 RSS Feed Reader에서 열어 등록하면 다음과 같이 Firebase의 댓글이 추가될때마다 알림과 내용을 받아볼 수 있습니다.


